One of the most common support requests is adding or deleting users from Microsoft Dynamics GP. This updated guide will walk you through both processes step by step.
How to Add a User to Dynamics GP
Prerequisites
- You must log in as SA (system admin) or a user who has administrative privileges in both Dynamics GP and SQL Server
- Ensure you have available user licenses
- Have the new user’s information ready
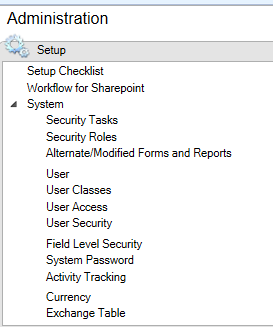
Step 1: Access User Setup
Go to Administration>>System>>Setup and select “User” from these options.
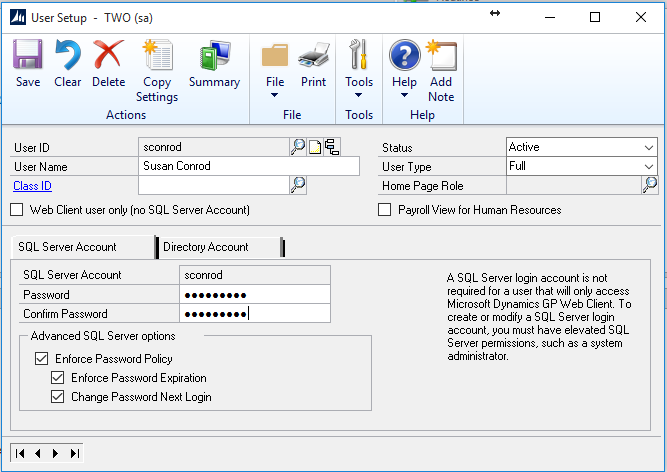
Step 2: Create the New User
- Enter the basic user information
- User ID (must be unique)
- User Name (full name of the user)
- Password (following your organization’s requirements)
Step 3: Copy Settings (Recommended)
Using the “Copy” feature saves time and ensures consistency. You will simply “Copy” the setting from another user that has similar or the same rights that you want this new user to have.
- Click “Copy” after creating the user – you will get the following screen first:

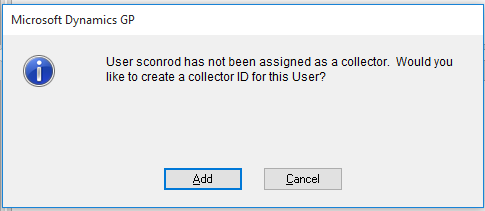
2. If you have collections management installed you will get the next screen:
Do you want to add them as a collector?
3. Select a template user with similar permissions
In the copy options window, select:
-
- Security Access (choose user to copy from)
- Home Page and Area Pages:
- Role to copy
- Home Page Content
- Area Pages settings
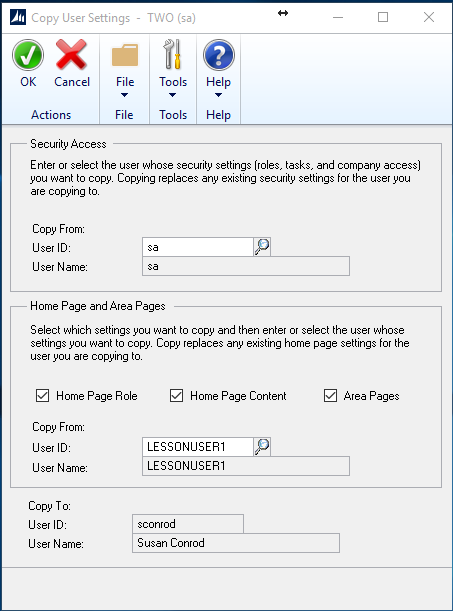
4. Verify the copy setup details
Alternative Setup Method (Without Copy)
If you prefer to set up the user manually:
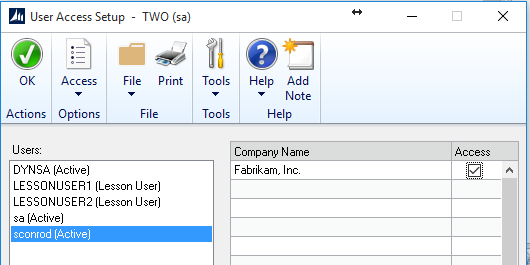
1. Go to Administration >> System >> User Access
-
- Check off required company access
- Set default company if needed

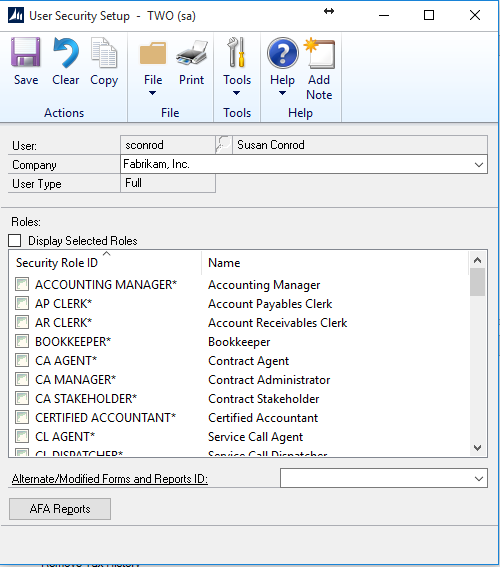
2. Navigate to Administration >> System >> User Security
-
- Assign appropriate security roles
- Set up specific tasks
If the user is setup in another company, and you just want to give them the same access, you can go to “copy” from a company they already have and COPY that access to other companies (new company).
Advanced SQL Server Options
If using Active Directory integration:
1. User authentication will follow Active Directory settings
2. Password expiration follows Active Directory policies
3. Temporary passwords can be set that require change at first login
Final Steps
1. Assign appropriate Modified Forms and Reports ID
- Standard user access
- Special privileges (e.g., Mekorma MICR for check printing)
2. Provide credentials to the new user
3. Have them log in and change their password
How to Delete a User in Dynamics GP
Important Notes Before Deletion:
- Transaction history will be preserved
- User ID remains associated with historical records
- Consider setting the user to inactive instead of deleting if you might need to restore access later
1. Log in to Dynamics GP as “sa” or an administrator within SQL and GP.
2. Go to Administration>>User Access
3. Uncheck the companies they have access to:
Then go to Administration>>USER

4. Navigate to Administration >> USER
5. Select the user and click DELETE
6. Log in to SQL Server Management Studio
7. Delete the corresponding SQL Server user
Post-Deletion Effects
- Historical records maintain the user ID
- Transaction history remains intact
- User will no longer be able to access Dynamics GP
Best Practices
- Document all user changes
- Regularly review user access and permissions
- Consider using user classes for easier management
- Maintain a standard naming convention
- Keep security role assignments updated
Troubleshooting Common Issues
- If a new user can’t log in, verify Windows vs. GP authentication settings
- Check company access settings if users can’t access specific companies
- Ensure SQL Server permissions align with GP permissions
For more great Microsoft Dynamics GP tips and tricks visit www.calszone.com/tips
If you are looking for Microsoft Dynamics GP support and training contact CAL Business Solutions at sales@calszone.com


